unity 3d add button to property drawer

The Unity Editor is (undeniably) an crawly engine for building games, merely frequently gets this shut to actually fitting your needs. At times, yous probably find yourself wishing for a "practice what I mean" button.
Although Unity isn't quite capable of interpreting brainwaves through some mystical push button, there ways to extend this tool to arrive more useful and user-friendly.
In this Unity tutorial, you'll learn how to extend and customize the engine. Aside from the achievement of being master of your domain, your changes should have the domino effect of speeding up game development by making the process a little (or a lot) leaner. :]
In particular, yous'll focus on how to use the following:
- Attributes for basic customization
- ScriptableObject to create custom assets and reduce retentiveness usage
- Customize the Inspector using
PropertyDrawerandEditor - Create a new editor window to provide your own editing tools
- Draw in a scene with gizmos
Are you doubtful that customizing Unity tin be helpful? On Gamasutra, you can detect a cool article nearly Unity and editor tools that prove a number of examples of how a custom editor can benefit your game blueprint and cosmos efforts.
Prerequisites
Y'all need Unity version 5.three or newer to load the starter project successfully. If you don't take it, then download Unity from Unity3D.com.
This tutorial is intended for advanced Unity developers, meaning you should know bones scripting and feel comfortable working in the Unity editor. If yous're not quite in that location, attempt honing your cognition with our other Unity tutorials.
Getting Started
Download the starter projection, unpack the zip file and open the resulting TowerDefenseEditor binder with Unity. As the binder name suggests, the projection is a tower defense game.
Although the game runs smoothly, information technology's difficult to edit. For case, the process for adding new open spots for the purpose of placing new "towers" is a chip annoying. Too, you tin can't run across the path the enemies follow.
In this tutorial, yous'll extend the Unity Editor to add those and a few more than features and then that it looks a lot like this:

The Editor After Customization
This tutorial goes from smaller to bigger changes. Each section is self-contained, then you lot may skip effectually and piece of work with the Editor extensions that pique your involvement.
Basic Customizations with Attributes
These give yous the power to drastically reorganize the Unity3D editor, just all you need are some small-scale adjustments, eastward.g., hiding a field, showing a tooltip or calculation a headline. Hiding unwanted fields and protecting others are two stiff use cases for attributes.
Hide Public Fields – [HideInInspector]
As per the default, all public fields of a MonoBehavior are exposed in Inspector, merely sometimes y'all don't want all that. Sometimes, you merely want to:
- Remove ataxia from Inspector
- Avoid accidental changes to a variable that could mess up your game

Time to get your hands dingy!
Go to the Assets/Prefabs folder and select Bullet1, and then look at Inspector. Y'all should come across the following:
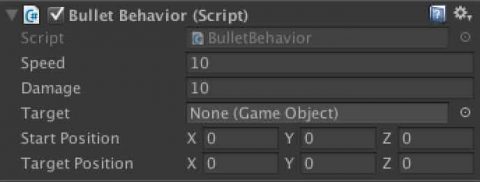
Earlier: Lots of fields you should not touch
You tin can meet the fields Target, Start Position and Target Position. Those variables are public because they need to be assigned past the ShootEnemies script.
However, they don't need to exist editable in Inspector because bullets always fly from the monster to its target; you don't need these fields exposed.
Open the script BulletBehavior.cs in the Assets/Scripts folder. Import using Organisation; by inserting information technology into line 2.
Before:
using UnityEngine; using System.Collections; After:
using UnityEngine; using System; using Organization.Collections; Add the [HideInInspector] and [NonSerialized] attributes earlier the lines that contain the definitions of the fields target, startPosition and targetPosition. [NonSerialized] is part of the Organization NameSpace, hence why you inserted using System; above.
Before:
public GameObject target; public Vector3 startPosition; public Vector3 targetPosition; Afterwards:
[HideInInspector] [NonSerialized] public GameObject target; [HideInInspector] [NonSerialized] public Vector3 startPosition; [HideInInspector] [NonSerialized] public Vector3 targetPosition; Salve your changes.
HideInInspector removes the field from Inspector and successfully hides the field. However, if you edit the value of the variable in Inspector before y'all hide things, Unity will retrieve the value yous set. This can exist confusing.
To avoid this, use the attribute [NonSerialized] to terminate Unity from remembering the value of the variable.
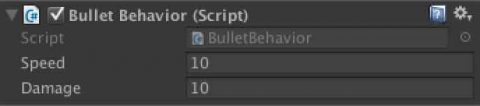
Later on: Fields are hidden
Note: Using attributes is unproblematic. Y'all just put them above the field, method or class they should influence, and you also have the option to combine several attributes.
[RequireComponent]: Avoid Accidentally Removing a Component
Try this on the OpenSpot prefab to make the placement always work every bit expected.
Open the file PlaceMonster.cs from the binder Assets/Scripts. Edit the code as follows:
Earlier:
using Arrangement.Collections; public class PlaceMonster : MonoBehaviour { After:
using Organization.Collections; [RequireComponent (typeof (AudioSource))] [RequireComponent (typeof(Collider2D))] public class PlaceMonster : MonoBehaviour { Save your changes.
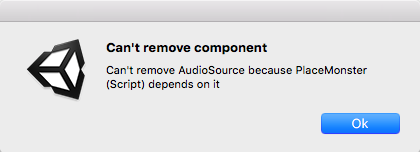
In Inspector, attempt to remove either the Collider2D or the AudioSource component from the OpenSpot prefab found in the Avails/Prefabs folder. A dialog appears when you try to delete it because of RequireComponent, it says you tin't remove it and also tells you which script requires it. Keen!
Other Interesting Tags
In addition to the ones you lot worked with to a higher place, there are enough more than cool attributes. Hither'southward a short overview:
| Usage | Aspect |
|---|---|
| Add items to Unity's menus | MenuItem, AddComponentMenu, ContextMenu, ContextMenuItem, CreateAssetMenu |
| Show or hibernate information | HeaderHelpURL, Tooltip, HideInInspector |
| Layout display in Inspector | Multiline, Range, Infinite, TextArea |
| Define constraints for component usage | RequireComponent, DisallowMultipleComponent |
| Specify whether to think the value of a field or not | NonSerialized, Serializable |
| Execute callback functions even when Editor isn't in playmode | ExecuteInEditMode |
| Configure the usage of the ColorPicker | ColorUsage |
ScriptableObject: Create Custom Assets and Reduce Memory Usage
In this section, you'll store a bullet's configuration in a ScriptableObject instead of within the GameObject.
Yous're probably thinking: But it worked perfectly fine with GameObject! Why should I change it? To understand why you would want to practice this, simply look into the basics of scriptable objects.
Scriptable Objects: The Basics
The intended use case for ScriptableObject is for those times yous need to reduce memory usage by fugitive copies of values.
How does it practise that? When yous create a GameObject, Unity stores all primitive types connected with it by value.
Your bullet has 2 integer fields: speed and harm. Ane integer requires 2 bytes, so you need 4 bytes total. Now imagine you have 100 bullets — you would already need at least 400 bytes. This is with no modify to speed or damage. It'southward a dandy way to speedily swallow resources.

Clean up that waste material
ScriptableObject stores these values by reference, so you could use it when:
- You lot store a lot of data for a item type of object.
- Values are shared between many GameObjects.
While the major value of ScriptableObject is that information technology reduces retentivity requirements, you lot can also use it to define custom avails for dialogs, level data, tile sets and more. This allows you to decouple information and GameObjects.
Implement a ScriptableObject
In this subsection, you'll create your beginning scriptable object.
Inside of Unity and in the Projection Browser, open up the Assets/Scripts binder, right-click it and select Create > C# Script. Name the script BulletConfig, open it and alter its contents every bit follows:
using UnityEngine; [CreateAssetMenu(menuName = "Bullet", fileName = "Bullet.asset")] public class BulletConfig : ScriptableObject { public float speed; public int harm; } And save.
CreateAssetMenu makes the creation of a ScriptableObject available under the Assets primary menu pick.
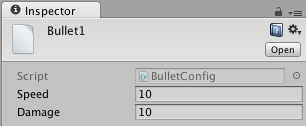
Switch back to Unity, get to the Project Browser and navigate to the Avails/Bullets folder. Click on Assets/Create/Bullet from the primary menu. Name the created nugget Bullet1 — now you have a overnice ScriptableObject.


Create ii more bullets named Bullet2 and Bullet3.
Now click on Bullet1 and go into Inspector. Set speed to 10 and damage to 10.
Echo for Bullet2 and Bullet3 with the following values:
- Bullet2: speed = x, damage = 15
- Bullet3: speed = ten, harm = xx
At present y'all'll supercede the speed and damage fields in BulletBehavior with BulletConfig. Open BulletBehavior. Remove the fields for speed and harm and add this field:
Earlier:
public float speed = 10; public int damage; Afterwards:
public BulletConfig bulletConfig; Since all your other scripts still need read access to speed and damage, you demand to create a getter for both variables.
Before the closing brace of the class, add the following:
private int damage { get { return bulletConfig.damage; } } private bladder speed { get { return bulletConfig.speed; } } Salve those changes.
Without touching whatever other script, yous improved memory usage by replacing the variables inside the bullets with a scriptable object.
Lastly, you need to assign your scriptable object to your bullet prefabs.
In the Projection Browser, select Prefabs / Bullet1. In Inspector, set Bullet Config to the Bullet1.nugget. Repeat this for Bullet2 and Bullet3 accordingly. Done!
Adding the scriptable objects to the bullet prefabs.
Run the game to brand sure everything still works.
Customize Inspector With PropertyDrawer and Editor
Then far, you lot've only inverse modest things, only could redraw about everything in Inspector. This section is all about flexing your redrawing muscles.
Editor
With Editor, you can replace Inspector GUI for a MonoBehavior. The implementation is to brandish the wellness of each enemy with a slider, where the slider'due south length depends on the maximum health of the enemy, making information technology impossible to enter invalid values.

Inspector for MoveEnemy before and after applying a custom editor
Within of the Assets / Editor folder, create a new C# script named EnemyDataEditor. Open the script in MonoDevelop. Supersede the contents with the following:
using UnityEditor; // 1 [CustomEditor(typeof(MoveEnemy))] // 2 public class EnemyDataEditor : Editor { // iii public override void OnInspectorGUI() { // 4 MoveEnemy moveEnemy = (MoveEnemy)target; HealthBar healthBar = moveEnemy.gameObject.GetComponentInChildren<HealthBar> (); // 5 healthBar.maxHealth = EditorGUILayout.FloatField ("Max Health", healthBar.maxHealth); // 6 healthBar.currentHealth = EditorGUILayout.Slider("Current Health", healthBar.currentHealth, 0, healthBar.maxHealth); // seven DrawDefaultInspector (); } } Salvage your changes.
This is how each stride works:
- Specify that Unity should create a
CustomEditorforMoveEnemyin this attribute. - Make
EnemyDataEditora bracket ofEditorso information technology can access methods such every bitOnInspectorGUI. - Add
OnInSpectorGUI, a method that's called when drawing the editor. - In
Editor, y'all can access the instance that'southward currently selected, either in the Project Browser or Bureaucracy, viatarget. Then you bandage information technology toMoveEnemy. Finally, y'all become its but child — theHealthBar. - Utilise
EditorGUILayout.FloatFieldto add a field formaxHealththat merely accepts float values. - Create a slider for the actual current health with
EditorGUILayout.Slider. This differs from simply using the attribute[Range]because it allows adjustments to the slider's range depending on a variable. In this example, information technology'shealthBar.maxHealth. - A custom editor replaces everything that would usually appear in the Inspector. In cases where you just desire to extend the existing view, y'all phone call
DrawDefaultInspector. Information technology draws any remaining default content in the location where you've added the call.
Switch dorsum to Unity and select Prefabs / Enemy in the Project Brower and enjoy your result.

Run the game to brand sure everything still works. You should now be able to select an Enemy(Clone) in the Bureaucracy and change its wellness on the slider in the Inspector while the game is in progress. Cheating was never so much fun. :]
![Slide or slider? - I know what I will choose :]](https://koenig-media.raywenderlich.com/uploads/2016/04/blue-1005940_640.jpg)
Slide or slider? – I know what I will cull :] (Published under CC0 on pixabay)
Property Drawers
With property drawers, you tin can:
- Customize the GUI for every instance of a Serializable grade, such as
Wave. - Customize the GUI for fields with custom PropertyAttributes, such as
Range.
In Hierarchy, select Road. Check out all the different waves in the Inspector.
Pretend that in add-on to the Enemy Prefab, you lot besides want to show a preview image of that prefab. You tin can do this with a PropertyDrawer for Wave.
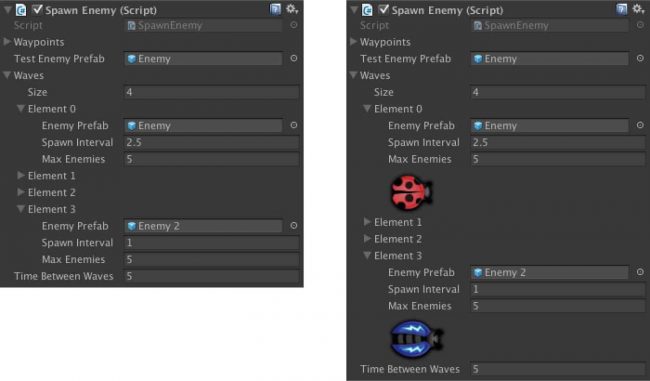
Customized Inspector with property drawer – before and later.
Start by creating a new C# Script named WavePropertyDrawer within the Assets/Editor folder in the Project Browser. Open information technology in MonoDevelop and replace the entire contents equally follows:
//ane using UnityEditor; using UnityEngine; //ii [CustomPropertyDrawer(typeof(Wave))] //three public course WavePropertyDrawer : PropertyDrawer { //four individual const int spriteHeight = 50; } Salvage your changes.
In this code block, you:
- Import
UnityEditorto enable access to the Editor'south libraries. - Use an Attribute to tell your form it's a
CustomPropertyDrawerforWave. - Make it a subclass of
PropertyDrawer. - Create a constant to store the summit at which the enemy sprite should exist drawn.
Become back in Unity and select Road in the Bureaucracy. Y'all should see the message No GUI implemented in Inspector.

Modify this and add OnGUI to WavePropertyDrawer:
public override void OnGUI (Rect position, SerializedProperty holding, GUIContent characterization) { EditorGUI.PropertyField(position, property, label, truthful); } Overriding OnGUI lets you implement your ain GUI. The method takes three arguments:
-
position: A rectangle to draw the GUI into -
property: The belongings yous desire to draw -
label: A text that labels the property
Yous describe the default GUI for the property with the method EditorGUI.PropertyField; information technology takes all the variables you go from OnGUI.
The concluding parameter is a bool variable that tells Unity to draw the property itself besides as its children.
In add-on to OnGUI, yous need to implement GetPropertyHeight():
public override float GetPropertyHeight(SerializedProperty property, GUIContent label) { return EditorGUI.GetPropertyHeight (property); } This method returns the pinnacle for the property, and is peculiarly important for properties that can modify height depending on whether the property is expanded or non.
If yous don't implement it then Unity assumes the default pinnacle. In cases where your belongings is higher, it will draw on summit of other fields in Inspector. This is usually not what you want. :]
Now that you accept the basics in place, you're free to customize the GUI. Add the following code to OnGUI():
// 1 if (belongings.isExpanded) { // ii SerializedProperty enemyPrefabProperty = property.FindPropertyRelative ("enemyPrefab"); GameObject enemyPrefab = (GameObject) enemyPrefabProperty.objectReferenceValue; // 3 if (enemyPrefab != null) { SpriteRenderer enemySprite = enemyPrefab.GetComponentInChildren<SpriteRenderer> (); // 4 int previousIndentLevel = EditorGUI.indentLevel; EditorGUI.indentLevel = 2; // 5 Rect indentedRect = EditorGUI.IndentedRect (position); float fieldHeight = base.GetPropertyHeight (property, label) + 2; Vector3 enemySize = enemySprite.bounds.size; Rect texturePosition = new Rect (indentedRect.x, indentedRect.y + fieldHeight * iv, enemySize.ten / enemySize.y * spriteHeight, spriteHeight); // 6 EditorGUI.DropShadowLabel(texturePosition, new GUIContent(enemySprite.sprite.texture)); // vii EditorGUI.indentLevel = previousIndentLevel; } } Save your changes.
Stride-by-pace breakup:
- You only desire to depict the enemy sprite when the details of the holding should be shown, for example, when the user unfolds it in Inspector. In this case,
property.isExpandedis true. - Go the enemyPrefab. It calls
FindPropertyRelativefirst to retrieve the belongings linked to another holding by name. Then information technology gets theobjectReferencethat stores the actual GameObject that contains theenemyPrefab. - If the
enemyPrefabis set, then you get its sprite. - Gear up the
indentLevelproperly. This level specifies how far to the correct Unity should commencement drawing. Since y'all'll need to restore its original value after you're washed cartoon, y'all store it in a variable offset, and then yous setindentLevelto 2. - Get the position of the
indentedRectand then you can summate the coordinates required to depict within a belongings drawer. And then yous get the top of one normal field withGetPropertyHeight. You lot demand the size of the enemy sprite also. With these iii values, you can summate the rect for cartoon the texture. The origin is that of theindentedRect. However, you add together 4 times thefieldHeightto reserve infinite for the fields fatigued. Because the peak should be the same, no matter the actual size of the enemy, you scale the width accordingly. - Telephone call
DropShadowLabelto describe a texture within the specified position. - In the end, y'all reset the indent level.
Get back to Unity to see the enemy sprite in the proper position. Information technology's there, but it overlaps with the adjacent holding. Why?

[spoiler]
You need to change the implementation of GetPropertyHeight() so that it returns the summit of the original belongings plus that of the sprite.
public override bladder GetPropertyHeight(SerializedProperty property, GUIContent label) { SerializedProperty enemyPrefabProperty = property.FindPropertyRelative ("enemyPrefab"); GameObject enemyPrefab = (GameObject)enemyPrefabProperty.objectReferenceValue; if (property.isExpanded && enemyPrefab != nil) { return EditorGUI.GetPropertyHeight (property) + spriteHeight; } else { render EditorGUI.GetPropertyHeight (belongings); } } Save your changes!
In GetPropertyHeight, it retrieves the enemy prefab.
If the belongings is expanded and the enemyPrefab isn't null, you add spriteHeight. Otherwise, it just returns the normal property height.
[/spoiler]
Become back to Unity and select Road in the Hierarchy. In Inspector, you can at present see the sprite of the enemy properly.
Aside from calculation one or more sprites, you tin can change Inspector more significantly. I example is directly from the PropertyDrawer documentation.

Belongings drawers allow y'all to customize how Inspector is drawn for whatsoever belongings of a Serializable class. They allow you to dictate how one specific belongings of your MonoBehavior is fatigued without a alter to the residue of Inspector.
Property drawers are especially helpful when yous desire to redraw items in an array.
However, they come with some serious drawbacks. Namely, you don't have access to EditorGUILayout(), leaving yous to calculate each field's position by yourself. Additionally, you lot tin can just access info stored in the property or its children.
Create a New Editor window to provide Your Ain Editing Tools
In Unity, you have several absurd Editor window, such equally Animator, Inspector and Hierarchy. And of course, you can even make your ain.
In this section, you'll implement an Editor view that allows you to place and delete OpenSpots with one click.

In the Project Browser, navigate to Avails/Editor and create a new C# Script named LevelEditorWindow. Open up it in MonoDevelop. Then supercede the entire contents with this:
using UnityEngine; //ane using UnityEditor; //2 public class LevelEditorWindow : EditorWindow { //3 int selectedAction = 0; } - Import
UnityEditor - Make
LevelEditorWindowa subclass ofEditorWindowto permit admission to methods and fields available toEditorWindow. - Keep track of which action the user currently has selected with the variable
selectedAction.
Right now, you lot couldn't open this level editor inside of Unity even if your life depended on it, and then add the following method to change that:
[MenuItem ("Window/Level Editor")] static void Init () { LevelEditorWindow window = (LevelEditorWindow)EditorWindow.GetWindow (typeof (LevelEditorWindow)); window.Show(); } In the beginning line, you lot tell Unity to create a MenuItem named Level Editor below the Window bill of fare, and y'all just click information technology to run Init.
With GetWindow inside, you get an existing open window or create a new one if none exists. Then you display it with Show.
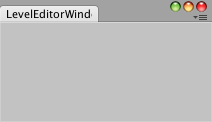
Salvage your changes and get dorsum to Unity. You lot'll see a alarm. That'southward alright — you lot'll set up it in a infinitesimal. Just go and click on the principal bill of fare Window/Level Editor to bring up an empty editor view.
At present to make full that empty view with content. Switch back to MonoDevelop and add the following code to LevelEditorWindow:
void OnGUI() { bladder width = position.width - five; bladder tiptop = 30; string[] actionLabels = new string[] {"10", "Create Spot", "Delete Spot"}; selectedAction = GUILayout.SelectionGrid (selectedAction, actionLabels, 3, GUILayout.Width (width), GUILayout.Peak (height)); } Showtime you lot get the width and superlative. For the width, you deduct 5 to go out a fiddling flake infinite. Next, you create a string array with the label for each activeness — "Ten" stands for no activity. This lets you select GameObjects instead of creating or deleting open up spots.
From this assortment, yous create a SelectionGrid, which creates a filigree of buttons where just i can be selected at in one case. The return value of SelectionGrid is the index of the currently selected button, so y'all shop it in selectedAction.
Save your changes and have a look at your cosmos in Unity.
You want to have a different reaction to clicks that's dependent on selected button in the scene, and so add the following method:
void OnScene(SceneView sceneview) { Upshot due east = Event.electric current; if (due east.type == EventType.MouseUp) { Ray r = Camera.current.ScreenPointToRay (new Vector3 (e.mousePosition.x, Camera.electric current.pixelHeight -e.mousePosition.y)); if (selectedAction == 1) { // TODO: Create OpenSpot Debug.Log("Create OpenSpot"); } else if (selectedAction == 2) { // TODO: Delete OpenSpot Debug.Log("Delete OpenSpot"); } } } First yous shop the current event in a variable. If its blazon is equal to MouseUp, you react to the mouse click.
For this, you demand to figure out which GameObject was selected, and yous're using Raycasting to practise information technology. But outset, you demand to create a ray that points towards the scene.
To make a ray, yous utilise the helper method ScreenPointToRay(), which you lot call with the mouse position stored in the outcome. Equally the y-coordinate is reversed between camera and event coordinate organization, you transform it past deducting the original y-coordinate from the height of the current view.
Lastly, you split by selectedAction and log a curt message.
Make certain the method is actually chosen with:
void OnEnable() { SceneView.onSceneGUIDelegate -= OnScene; SceneView.onSceneGUIDelegate += OnScene; } This adds OnScene equally delegate.
Relieve your changes and switch dorsum to Unity. Select the Create Spot or Delete Spot button inside of the LevelEditorWindow, and then click inside of the Scene. The log message volition appear in the Console.

In the Hierarchy, select Groundwork. In the Inspector, set its Layer to Background. Then add a component Physics 2D / Box Collider 2D.

Prepare the Layer of Prefabs/Openspot to Spots. At present y'all tin can determine where a ray collided with the background or an open spot.

Go back to MonoDevelop and supervene upon TODO: Create OpenSpot in LevelEditorWindow with this code:
RaycastHit2D hitInfo2D = Physics2D.GetRayIntersection (r, Mathf.Infinity, one << LayerMask.NameToLayer ("Background")); if (hitInfo2D) { GameObject spotPrefab = AssetDatabase.LoadAssetAtPath<GameObject> ("Avails/Prefabs/Openspot.prefab"); GameObject spot = (GameObject)PrefabUtility.InstantiatePrefab (spotPrefab); spot.transform.position = hitInfo2D.indicate; Undo.RegisterCreatedObjectUndo (spot, "Create spot"); } Here'south what y'all're doing in there:
It starts past checking whether the ray intersects with the background prototype. If yes, so hitInfo2D isn't null and you create a new
You become the prefab with LoadAssetPath. From this example, you create a new instance of this prefab with PrefabUltility.InstantiatePrefab.
InstantiatePrefab() creates a prefab connectedness, which makes information technology more suitable in this case then Instantiate. Then you lot prepare the position of the spot to the indicate of the standoff.
Unity always lets y'all disengage actions, and then remember that when y'all create custom editor scripts. To let undo with a custom action, simply register the action used to create a GameObject with Undo.RegisterCreatedObjectUndo.
Now to handle deleting spots. Supercede // TODO: Delete OpenSpot with this:
RaycastHit2D hitInfo2D = Physics2D.GetRayIntersection (r, Mathf.Infinity, 1 << LayerMask.NameToLayer ("Spots")); if (hitInfo2D) { GameObject selectedOpenSpot = hitInfo2D.collider.gameObject; Undo.DestroyObjectImmediate (selectedOpenSpot); } This detects collisions betwixt your ray and any object within the Spots layer. If aye, you become the GameObject that was hitting. Then you delete it with Undo.DestroyObjectImmediate, which removes the spot and registers the action with the undo managing director.
Go back to Unity, and check out how speedily you lot tin create and delete spots. Best of all, disengage and redo work as expected.

Draw Into the Scene with Gizmos
Gizmos permit you to describe into the Scene view, allowing you to provide information to use every bit a visual debugging or editing assist.
For example, the game contains a set of waypoints for the enemies to follow, but they are invisible during the game and while editing. You only can't tell which path they'll follow without doing some serious investigative piece of work. If you wanted to create another level, you withal wouldn't exist able to see the path.
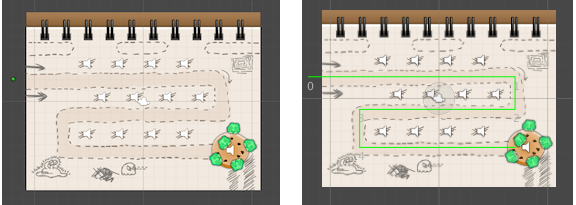
Before: Without - Subsequently: A line between the spots shows how enemies will move
Fortunately, Gizmos let you to see this invisible path.
Open Assets/Scripts/SpawnEnemy, which stores all waypoints, and add the following method:
// 1 void OnDrawGizmos() { // two Gizmos.color = Color.green; // 3 for (int i = 0; i < waypoints.Length - one; i++) { // 4 Vector3 beginPosition = waypoints[i].transform.position; Vector3 endPosition = waypoints[i+1].transform.position; // 5 Gizmos.DrawLine(beginPosition, endPosition); // six UnityEditor.Handles.Characterization (beginPosition, i + ""); } // seven Vector3 lastWaypointPosition = waypoints[waypoints.Length - 1].transform.position; UnityEditor.Handles.Label (lastWaypointPosition, (waypoints.Length - i) + ""); } Here are explanations for each step:
- You can but use methods for gizmo drawing in
OnDrawGizmos()or inOnDrawGizmosSelected(). You lot always desire the path to depict, so you implementOnDrawGizmos(). - You fix the colour for the gizmo's cartoon. Every draw call volition use this color until yous change it.
- Iterate over all waypoints, except the last i that doesn't have successor to depict a line to, so yous terminate at
waypoints.Length - 1. - You store the position of waypoint i, and its successor i+1. into a variable with every iteration.
- With the static method
Gizmos.Drawline(Vector3, Vector3), y'all describe a line from the current waypoint to the side by side waypoint. - With
UnityEditor.Handles.Label(string), you lot write the alphabetize of the waypoint side by side to it to brandish the path and visualize the direction that enemies move. - You lot become the position of the terminal waypoint and display its alphabetize next to information technology.
Switch back to Unity to run into the path. Play with it a bit past moving waypoints around and yous'll encounter the path follows along.
Aside from DrawLine(), Gizmos provide several drawing functions. You can notice the total list in the documentation. There is even a DrawRay:

Hmmm, that's definitely a Ray, but something seems off...
Where To Go From Here?
In this tutorial, you learned how to make parts of the Unity Editor your own. To see the final consequence, download the finished project hither.
As yous probably guessed, in that location are more means to extend Unity. Here are some boosted directions you could go:
- Processing avails on import and after salvage
- Creating editor wizards
- Getting to know more GUI elements such as ColorField, CurveField, Toggle, or Popup
- Learning more nearly layouting
Now that you've made information technology to the bottom, you've got a skilful fleck of starting knowledge about how to to customize Unity for your own purposes and projection.
Join us in the forums to toss around ideas and examples, as well every bit ask questions almost customizing Unity. I'm looking forward to seeing what you come up up with!
courtneytheigiche42.blogspot.com
Source: https://www.raywenderlich.com/939-extend-the-unity3d-editor
0 Response to "unity 3d add button to property drawer"
Post a Comment